Laser solder seam inspection is an important process in the manufacturing industry to ensure the quality of soldered assemblies. By using our vision systems, automotive manufacturers can perform precise measurements and detect defects in real time. With a combination of 2D color analysis and 3D height profile measurement (triangulation method) in our vision systems, car manufacturers can produce more efficiently and reduce production costs. This advanced technology makes it possible to improve soldering quality and reduce rejects.
The LaserSeamInspection system (LSI system) has been developed by K+P for the inspection of laser soldered seams and CMT Braze+ seams. The system components include a stationary IPC running K+P's own standard software KUPvision, and one or more LSI sensor heads. The robust sensor heads have a modular design and can be equipped with up to 3 cameras and laser modules. The entire camera and lighting technology is protected and integrated in a space-saving enclosure.
There are various criteria for inspecting the quality of roof seams, tailgates and sealing channel seams. Our LSI system was developed with the aim of carrying out this inspection quickly, reliably and cost-effectively using various parameters that can be freely selected by the user. The use of our robust sensor heads on a robot, with or without a grinding head, enables inspection of all seam geometries (convex/concave) and seam positions (roof/sealing channel). The maximum movement speed, e.g. for roof seam inspection, is 200 mm/s. This enables the inspection of long roof seams (approx. 2 m) to be completed within 10 seconds and the very short cycle times in the production process to be observed.
Why LSI system from K+P?
- Proven technology - robust hardware, standardized and very easy to use software KUPvision
- 2D/3D technology - reliable detection, measurement and recognition of defects
- Extraneous light - absolutely independent of extraneous light influences
- Movement speed – up to 200 mm/s
- Interfaces - ProfiNet, Interbus, Oracle, FISeQS, FuQS, XML etc.
- Complete solutions - projects from one hand from the beginning to the system handover (turn key)
- Service - fast reaction times with good on-site support
How it works?
The inspection system receives the vehicle type to be inspected and the part number via the process bus (e.g. ProfiNet or Interbus) and acknowledges the data to the overoperating control (PLC). If the data is identical and all system components are ready, the start signal is given. The laser seam is inspected and images are evaluated. At the end, after the robot completion message(s), the inspection system transmits one of the three possible end results: seam OK, seam Warning or seam QStop to the PLC.
At the same time, an overview screen with the final result is generated and displayed on the PC monitor or on the second large screen at the rework station. Thus, all defects and the stored images are clearly displayed to the operator. This avoids a tedious manual search for defects. In addition, all recorded camera images can be archived on a file server specific to the vehicle number.
The system is already being used successfully by various automobile manufacturers and is a powerful tool for quality assurance.
Some statements from our customers:
- "This enables a 0 % error slip to be achieved before delivery to the paint shop"
- "Projected, the use of a laser seam inspection system with an effective quality control circuit reduces rework by 3042.62 hours per year."
- "... low purchasing costs ... "
Schematic system designs:
The main inspection software KUPvision as standard user interface at all plants:
Sensor heads and technical data:
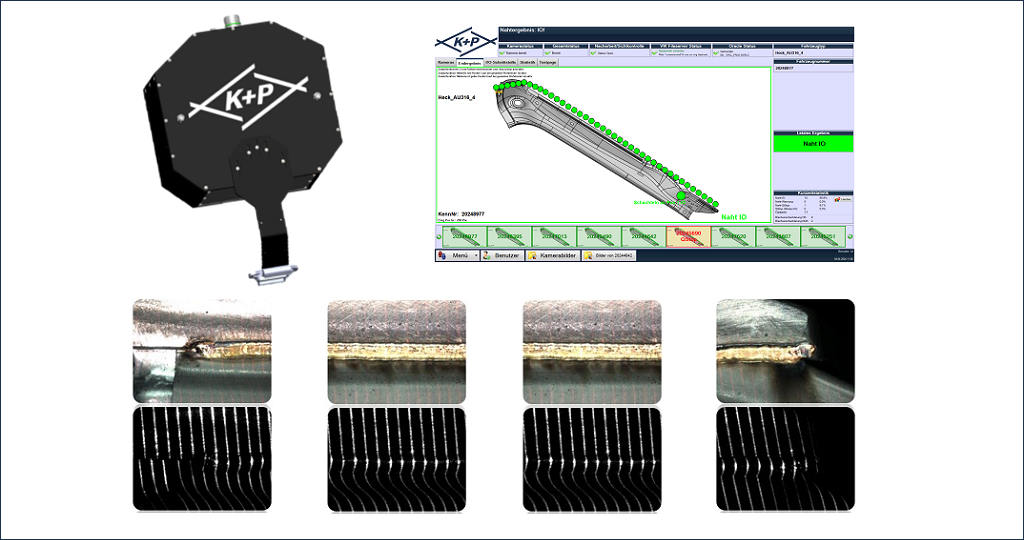
The following images show some examples of roof seam inspection:
Roof seam NOK example images with seam incline and demolition:
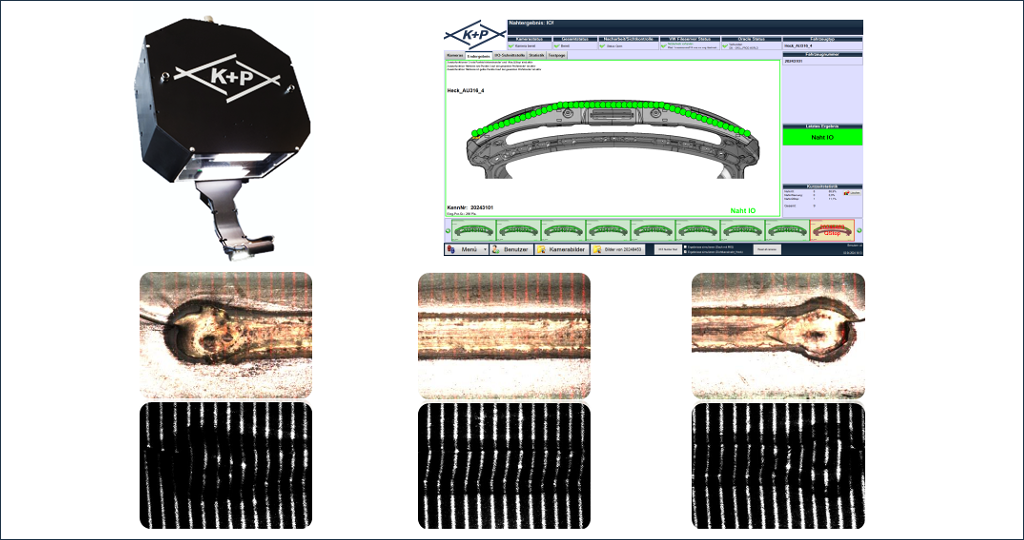
The following images show some examples of sealing channel seam inspection:
Sealing channel seam NOK sample images with faulty wire feed: